Project Raspberry Pi Zero EDUcation
Raspi startup for Education : connected traffic lights
Project Raspberry Pi Zero EDUcation
4-5 Gruppen, (Analog-Schalter, Ampel 1-4)
5 Raspi , MicroSD-Karte ,
5 x Stromversorgung
Netzterkverbindung ,
1 WLAN - Router + IP + DHCP
5 x 3 LEDs (Rot / Gelb / Grün ) mit Vorwiederstand ,
3 x 5 Verbindungskabel LED
5 x Schalter

Software:
ISO Image Rasberian
ISO Image Config : + Client Wlan zum WLANRouter + SSH-Server + RDP - Server, VPN Server
Putty + Winscp + RDP Client / REal - VNC Client
Plan B Raspi 3 B oder Raspi 4
Plan Story
Messen von Signalen und steuern Ampel - LED - Signal
Western Electric Rules - Anomalie - Erkennung
3 LEDs
An / Aus, langsam blinken / schnell blinken
Sensor
- Phyphox 3 Achsen
Raspberry Pi Spec
Raspi Specs
- https://www.reichelt.de/bilder/_LP/LP/2018-02_Entwicklerboards/Tabelle_EB.pdf?&trstct=lp_1358_143268
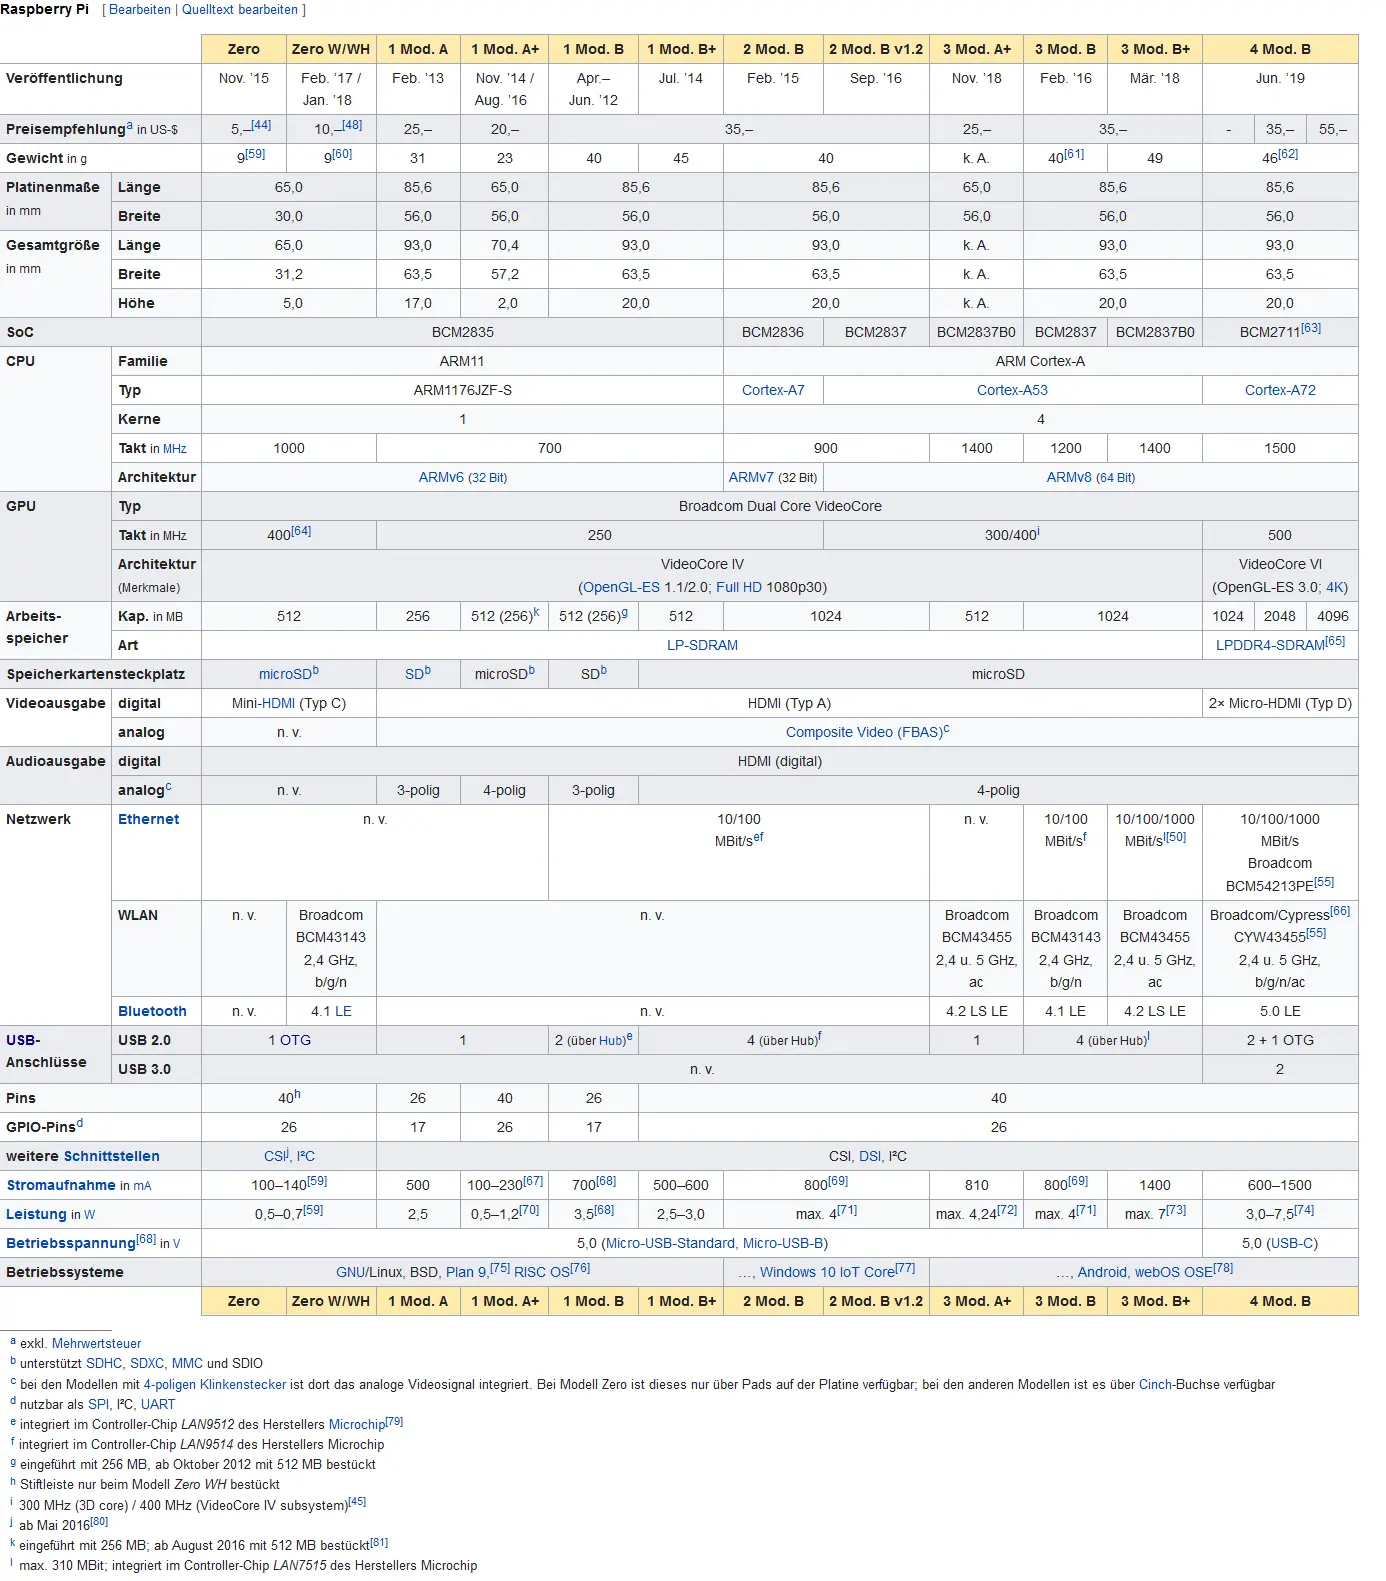
Pi Zero Spec
Broadcom BCM2835. This contains an ARM1176JZFS (ARM11 using an ARMv6-architecture core) with floating point, running at 1GHz, and a Videocore 4 GPU.
Armv6 - wird leider (noch ) nicht von VS Code unterstützt
Raspberry Pi Zero W will remain in production until at least January 2026
SSH
Datei mit dem Namen “SSH” anlegen
WLAN - Wireless LAN
- kein Kabel benötigt
WLAN Router
Setup Router / UMTS - Router mit Handy und Sim
Netzwerk Einstellungen - lokales Netz - Netzwerktopologie - DHCP-Server + Adress Range - Route z.B. IP 192.168.1.1 / SubNetMask 255.255.255.0 oder 10.0.0.1 / 255.0.0.0
Wlan SSID setzen “PIWLAN” - Passwort setzen “PaSSWoRd” - ignore 5Ghz - use 2.4 Ghz - Use WPA-PSK
WLAN Raspi
https://pi-buch.info/wlan-schon-vor-der-installation-konfigurieren/
Datei mit dem Namen “wpa_supplicant.conf” anlegen mit UNIX (LF) mit
country=DE
ctrl_interface=DIR=/var/run/wpa_supplicant GROUP=netdev
update_config=1
network={
     ssid="PIWLAN"
     scan_ssid=1
     psk="PaSSWoRd"
     key_mgmt=WPA-PSK
}
check - tools
ifconfig
sudo apt-get install iw
iwlist chan
dmesg
SSH Raspi
SSH - Enable : Datei .ssh auf dem Image erzeugen
ssh putty
login: pi, pass: raspberry
mc
sudo apt-get install mc
RDP
optional:
xrdp RDP server
sudo apt-get install xrdp
optional
sudo reboot
RDP Clients
Linux
Mac OS X
Code
Remote Debugging
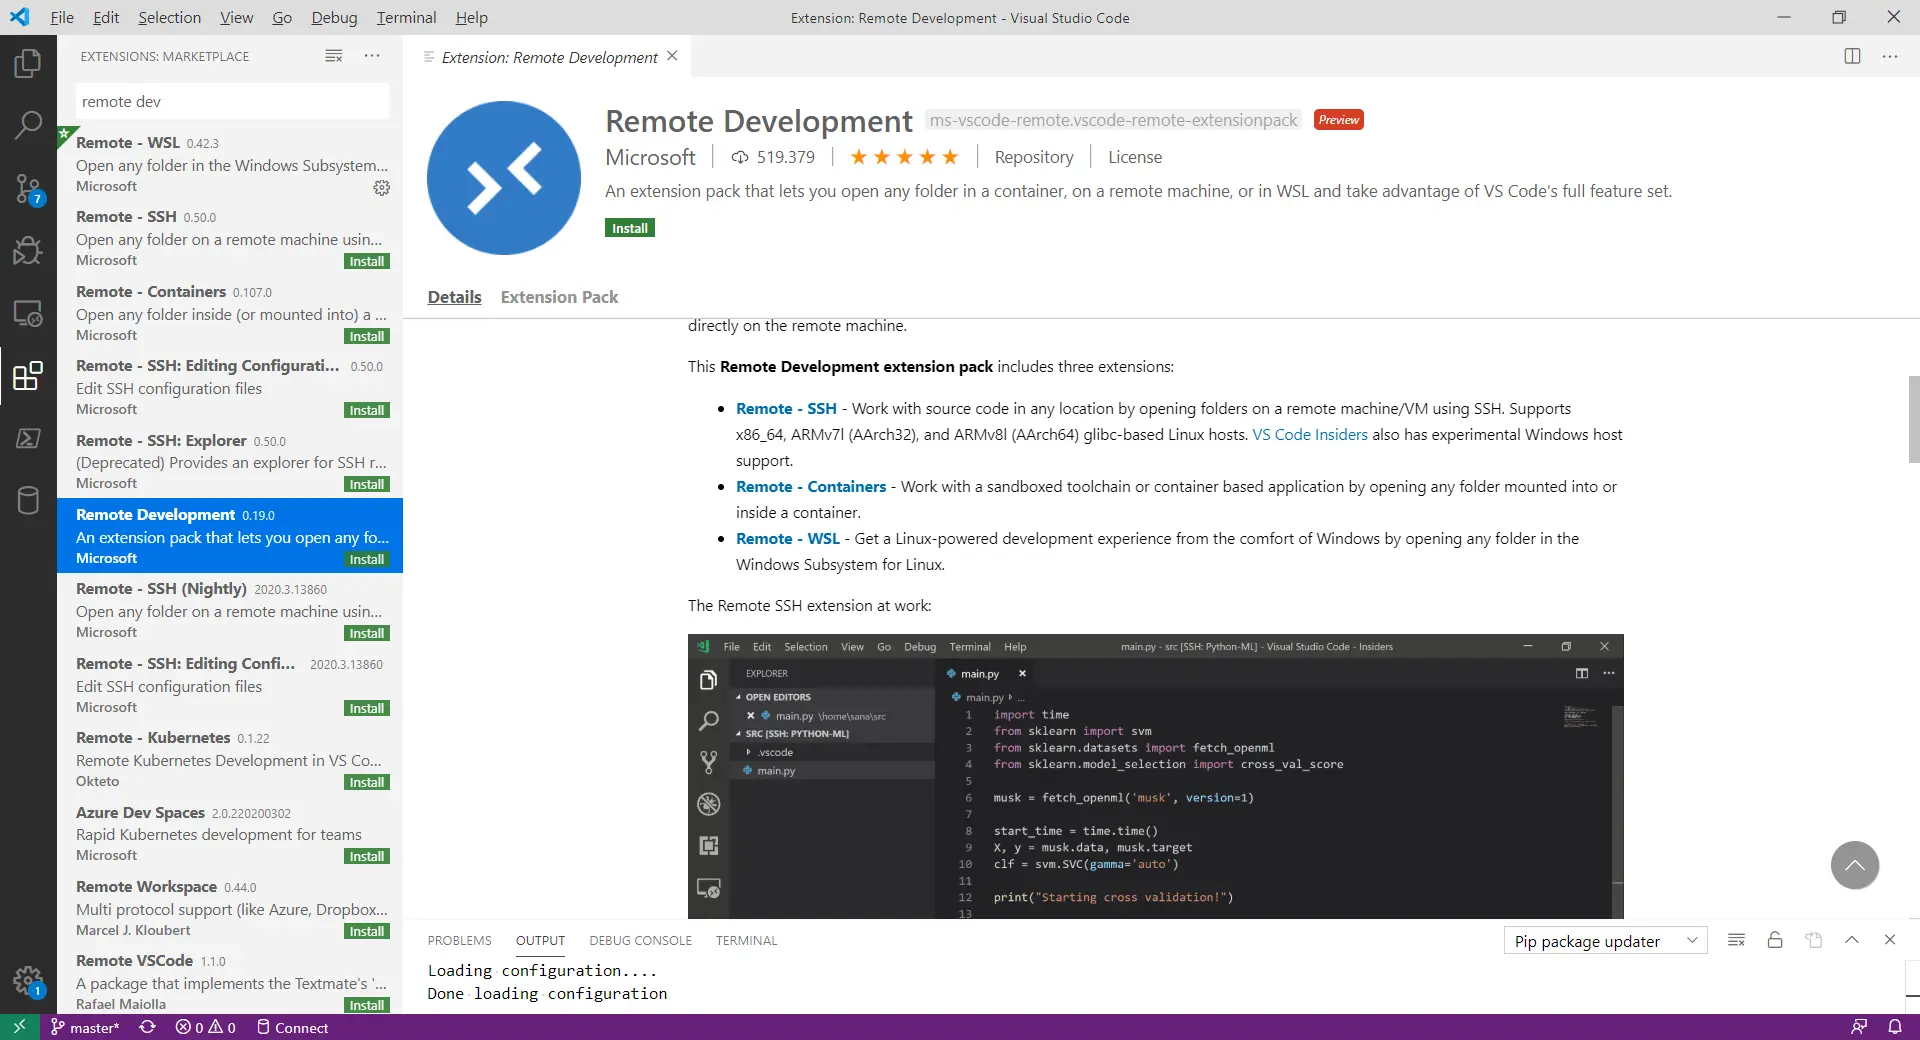
VS CODE Remote Dev Extension
(funktioniert leider (noch ) nicht auf Raspi Zero (Arm V6)) soll März 2020 kommen
-
https://github.com/microsoft/vscode-remote-release/issues/2493
-
https://github.com/microsoft/vscode-remote-release/issues/669
Pinbelegung
pinout
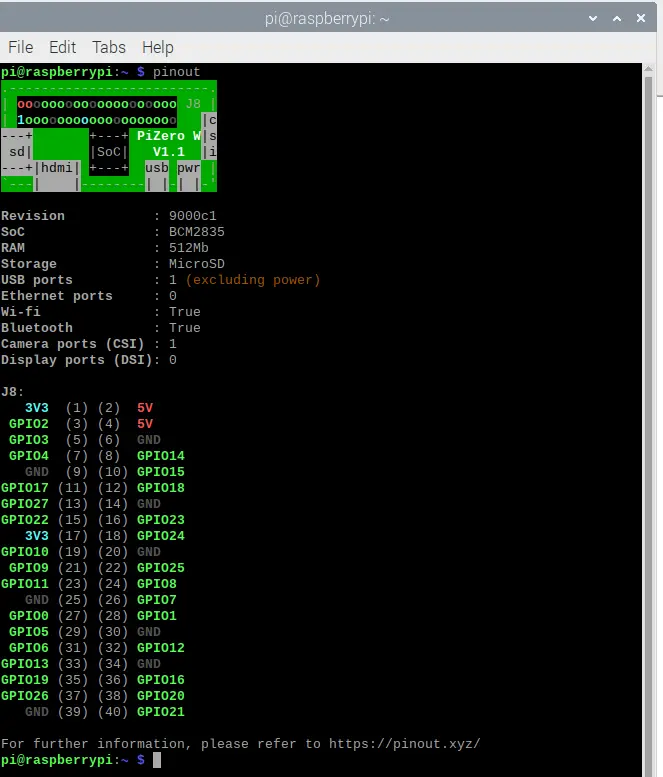
Interactive Pinout
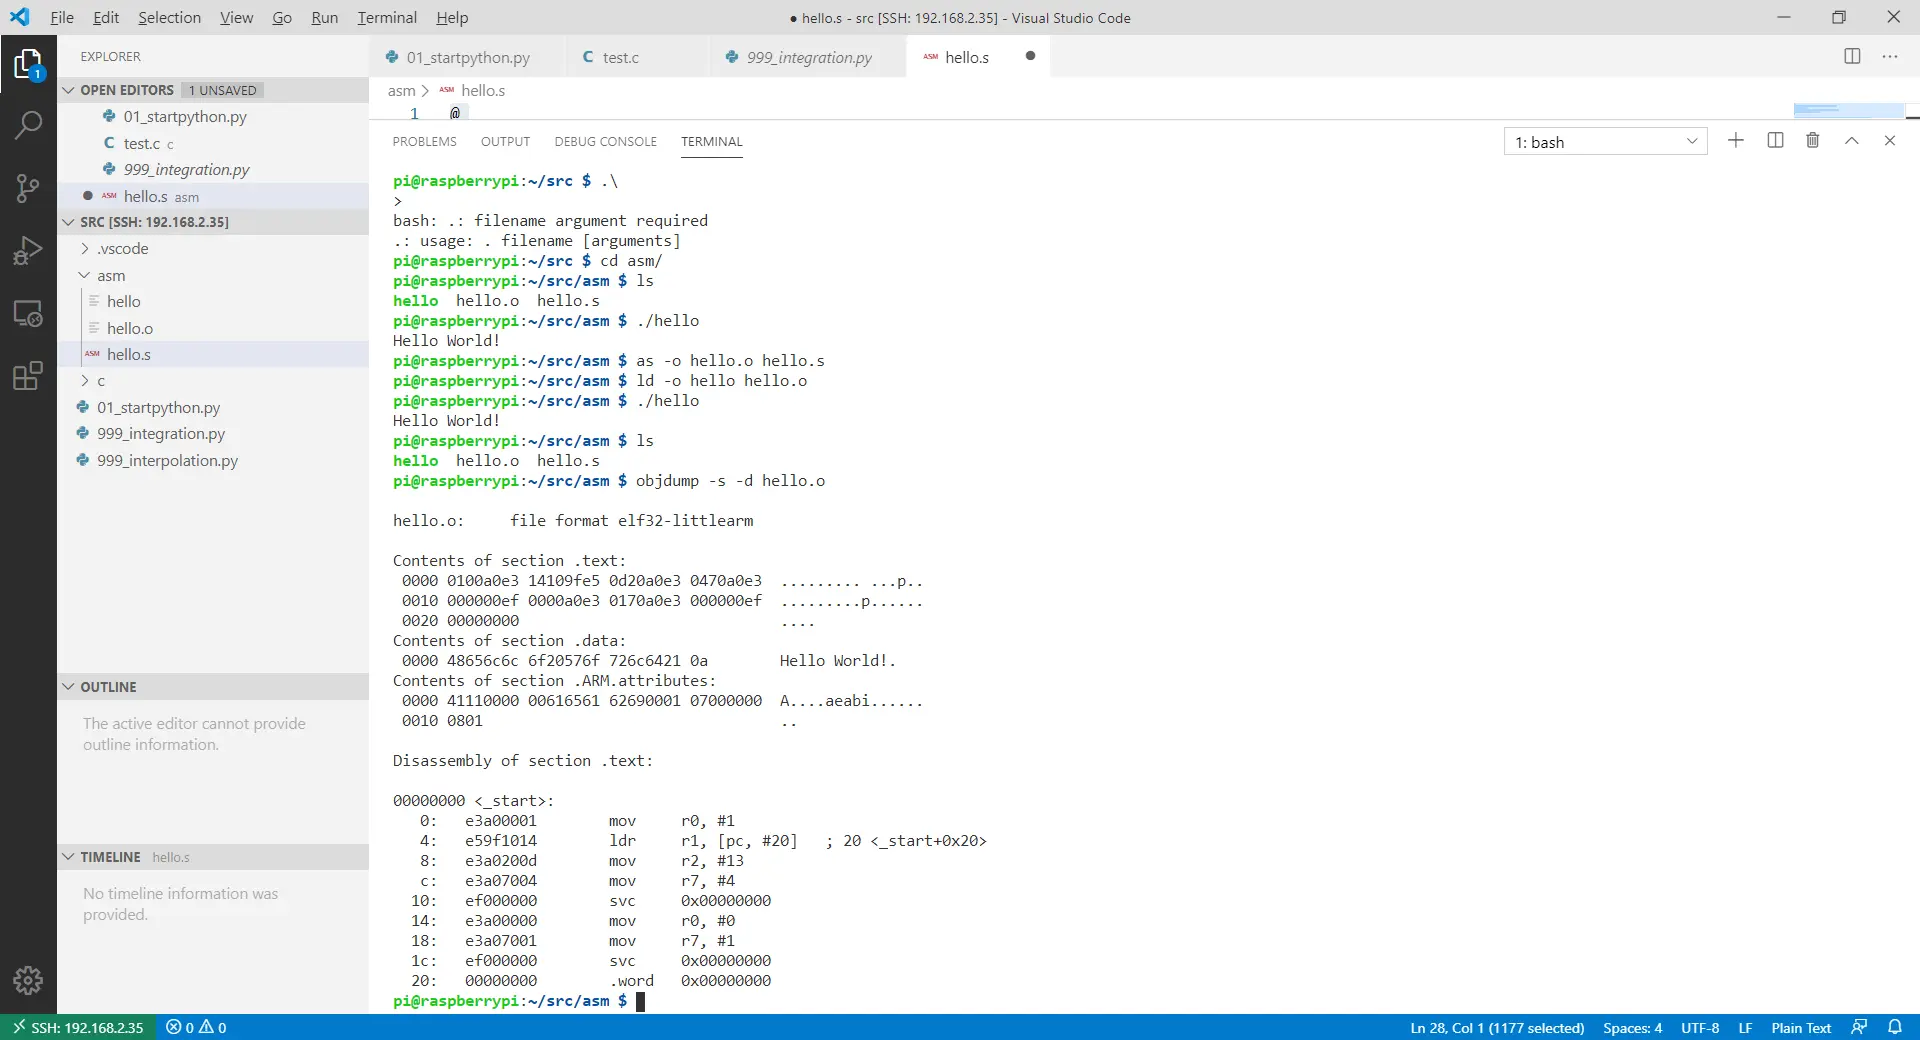
RasPi Asm
    @
    @ Assembler program to print "Hello World!"
    @ to stdout.
    @ R0-R2- parameters to linux function service
    @ R7- linux function number
    @

    .global _start                  @ Provide program starting@ address to linker

    @ Set up the parameters to print hello world
    @ and then call Linux to do it.

    _start:
        mov R0, #1                  @ 1 = StdOut
        ldr R1, =helloworld         @ string to print, Load Register R1 with adress of string helloworld
        mov R2, #13                 @ length of our string, Move number 13 into Register 2
        mov R7, #4                  @ linux write system call, Move number 4 into Register R7
        svc 0                       @ Call linux to print, send control to interupt handler in linux kernel and interpret Register

    @ Set up the parameters to exit the program
    @ and then call Linux to do it.
        mov R0, #0                  @ Use 0 return code
        mov R7, #1                  @ Service command code 1
                                    @ terminates this program
        svc 0                       @ Call linux to terminate
    .data                                   @ Data Section
    helloworld: .ascii "Hello World!\n"     @ Ascii - Text - Data
as -o hello.o hello.s
ld -o hello hello.o
.\hello
objdump -s -d hello.o
USB Video
sudo apt install fswebcam
fswebcam image.jpg
fswebcam -r 1280x720 image2.jpg
fswebcam -r 1280x720 --no-banner image3.jpg
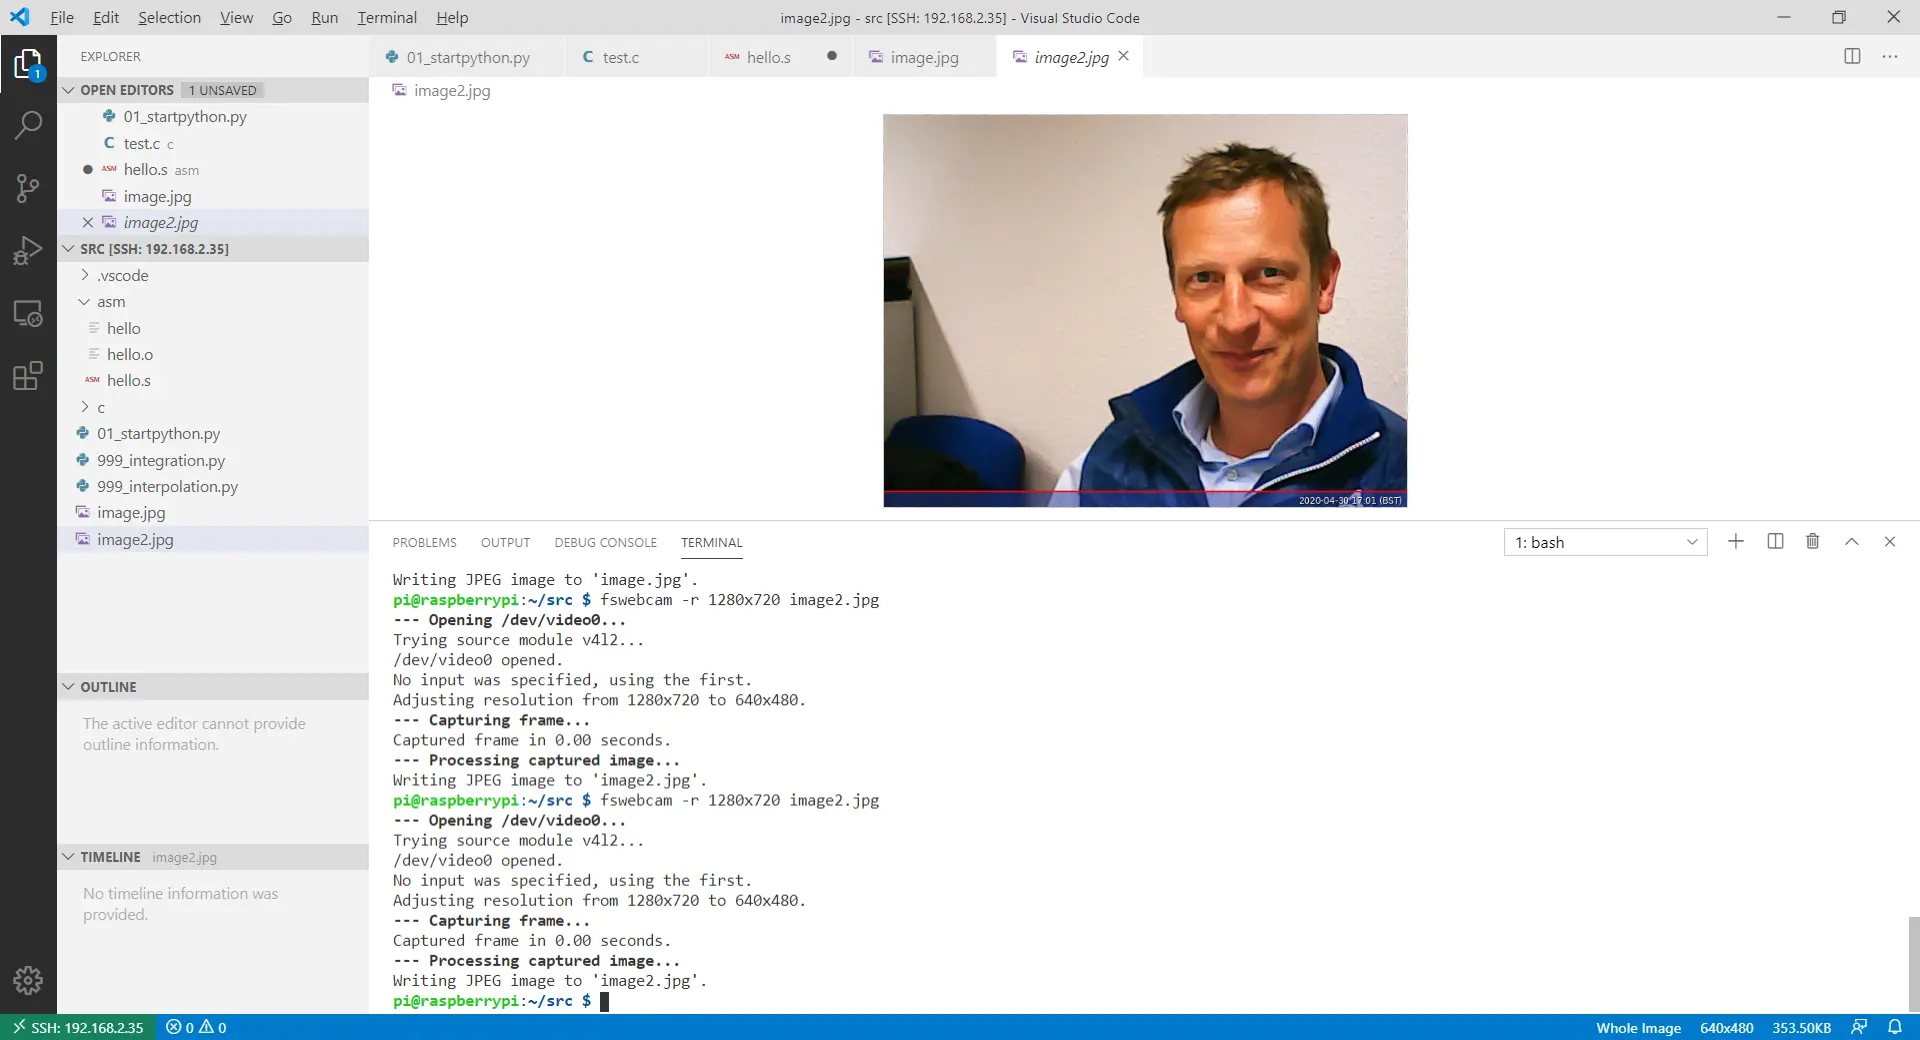
https://www.raspberrypi.org/documentation/usage/webcams/
Python 2 / 3
Nicht genutzt: python -> python 2
aktuell benutzt: python3 -> python 3 , pip3
Jupyter
pip3 install jupyterlab
-
How to create a dashboard in Python with Jupyter Notebook?
Python Web Socket Server
Einfacher Echo - Server
    #!/usr/bin/env python3

    ## Working  2020-05-05, https://realpython.com/python-sockets/#tcp-sockets

    import socket

    HOST = '127.0.0.1'  # Standard loopback interface address (localhost)
    PORT = 65432        # Port to listen on (non-privileged ports are > 1023)

    with socket.socket(socket.AF_INET, socket.SOCK_STREAM) as s:
        s.bind((HOST, PORT))
        s.listen()
        while True:
            conn, addr = s.accept()
            with conn:
                print('Connected by', addr)
                while True:
                    data = conn.recv(1024)
                    if not data:
                        break
                    print ("Data: " , data)
                    conn.sendall(data)
### Python Web Socket Client
    import socket

    #c = socket.socket()
    clientsocket = socket.socket(socket.AF_INET, socket.SOCK_STREAM)

    clientsocket.connect (("www.google.com", 80))

    reqest = "GET / HTTP/1.1\n\n"

    clientsocket.sendall (bytes(reqest, "ascii"))

    i=0
    while True:

        data = clientsocket.recv(40960)
        if not data:
            break

        i +=1
        print(i, data)
        if b"</html>" in data:
            break
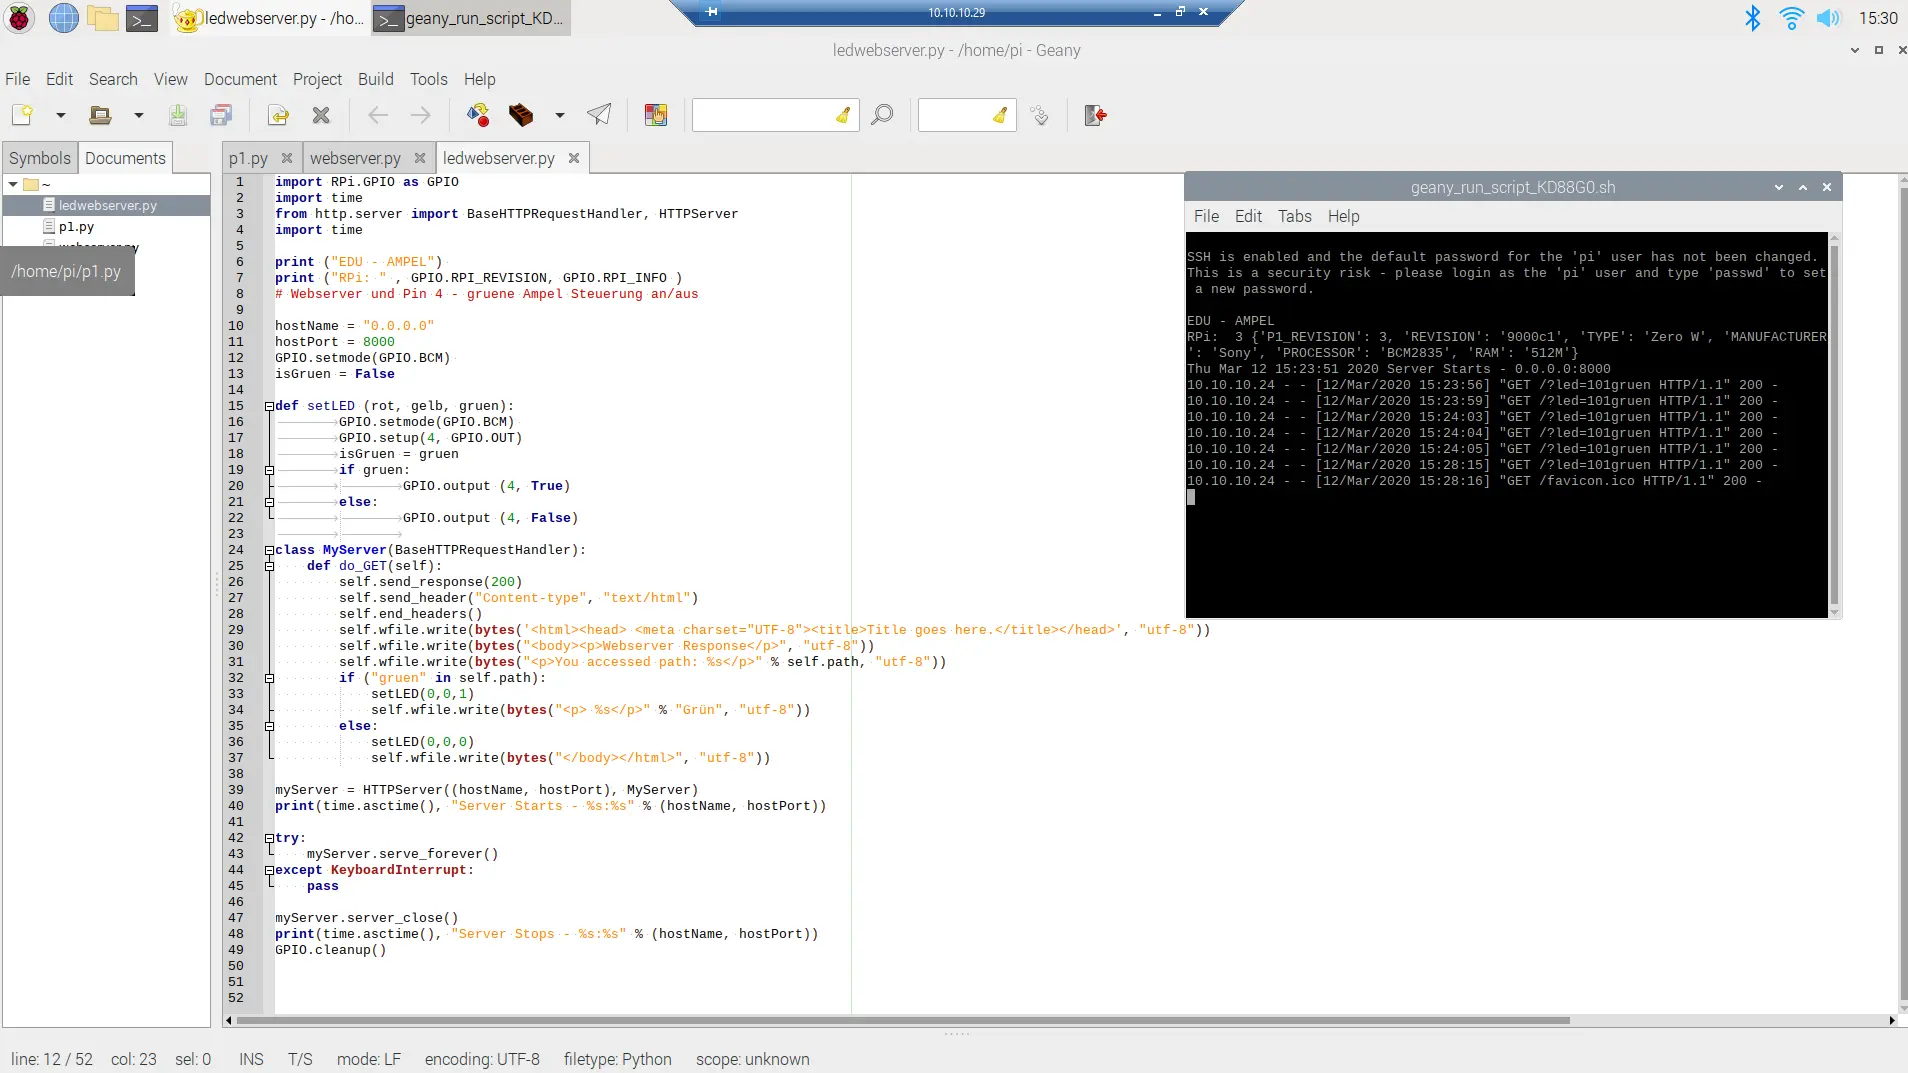
Python WebLed-Code
import RPi.GPIO as GPIO
import time
from http.server import BaseHTTPRequestHandler, HTTPServer
import time
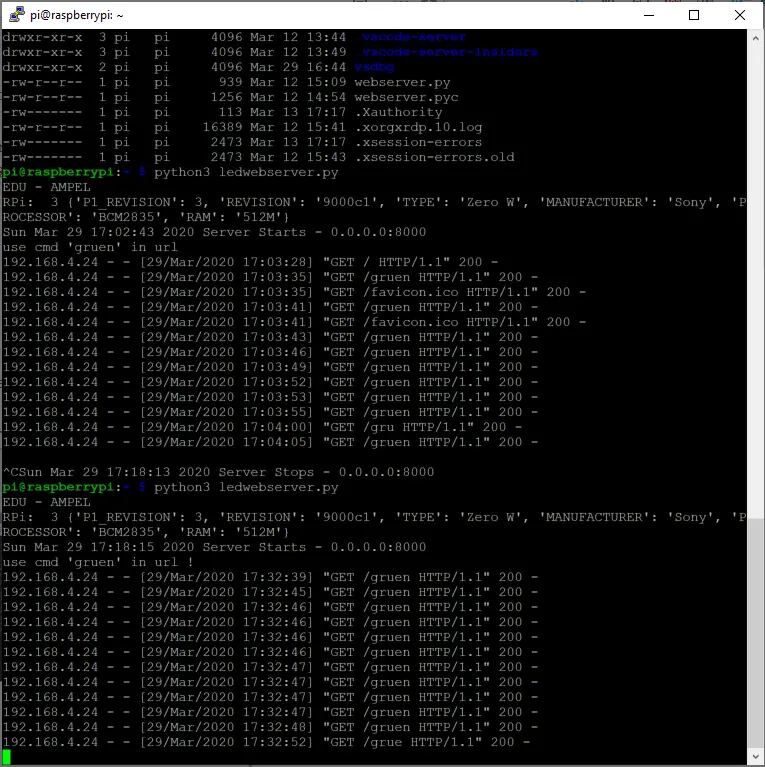
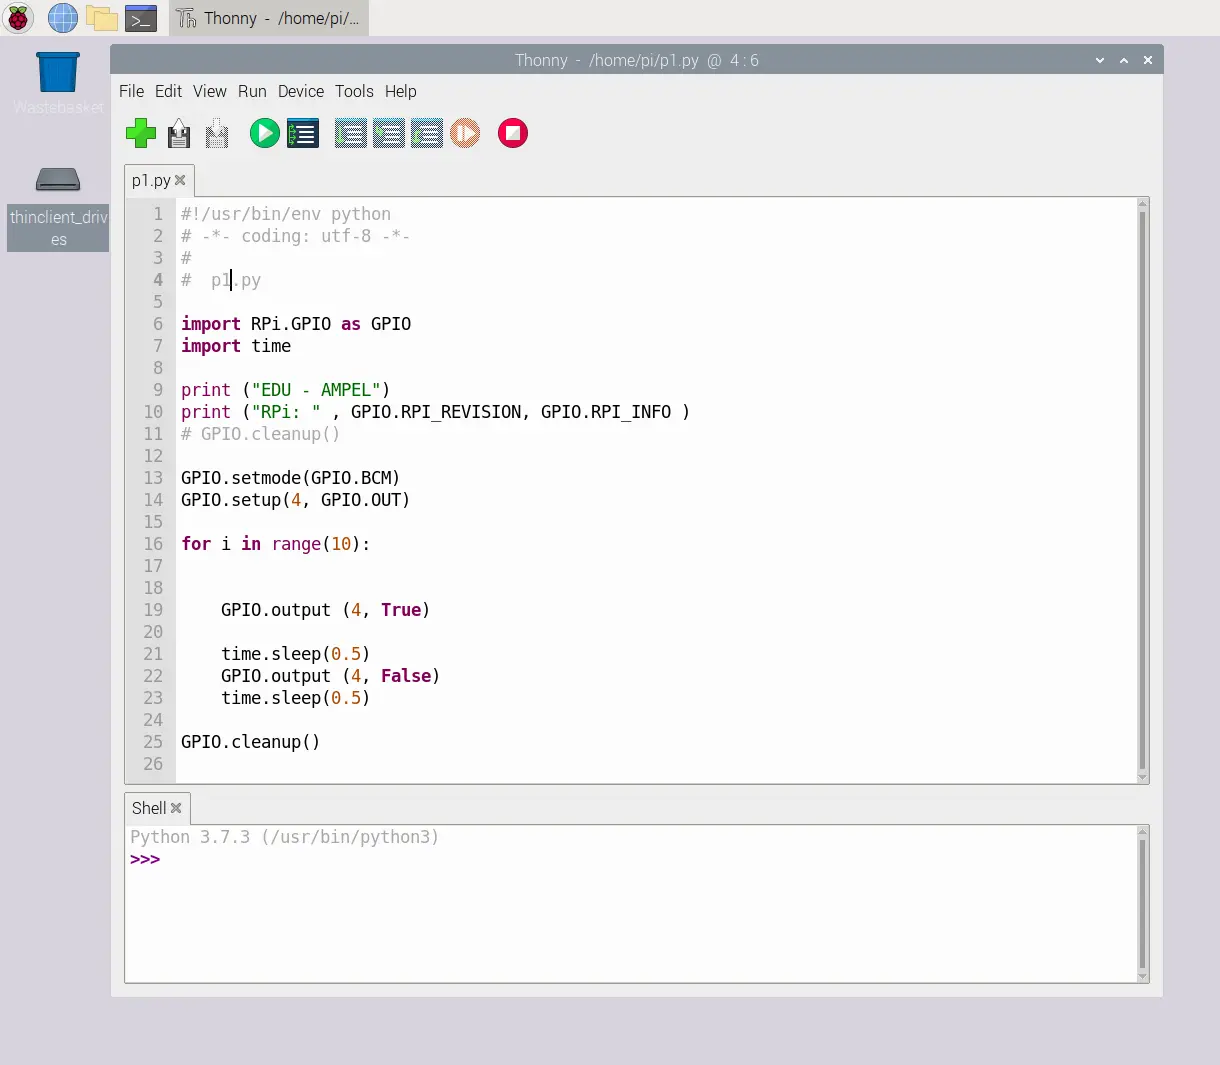
print ("EDU - AMPEL")
print ("RPi: " , GPIO.RPI_REVISION, GPIO.RPI_INFO )
# Webserver
hostName = "0.0.0.0"
hostPort = 8000
GPIO.setmode(GPIO.BCM)
isGruen = False
def setLED (rot, gelb, gruen):
GPIO.setmode(GPIO.BCM)
GPIO.setup(4, GPIO.OUT)
isGruen = gruen
if gruen :
GPIO.output (4, True)
else:
GPIO.output (4, False)
class MyServer(BaseHTTPRequestHandler):
def do_GET(self):
self.send_response(200)
self.send_header("Content-type", "text/html")
self.end_headers()
self.wfile.write(bytes('<html><head> <meta charset="UTF-8"><title>Title goes here.</title></head>', "utf-8"))
self.wfile.write(bytes("<body><p>Webserver Response</p>", "utf-8"))
self.wfile.write(bytes("<p>You accessed path: %s</p>" % self.path, "utf-8"))
if ("gruen" in self.path):
setLED(0,0,1)
self.wfile.write(bytes("<p> %s</p>" % "Grün", "utf-8"))
else:
setLED(0,0,0)
self.wfile.write(bytes("</body></html>", "utf-8"))
myServer = HTTPServer((hostName, hostPort), MyServer)
print(time.asctime(), "Server Starts - %s:%s" % (hostName, hostPort))
try:
myServer.serve_forever()
except KeyboardInterrupt:
pass
myServer.server_close()
print(time.asctime(), "Server Stops - %s:%s" % (hostName, hostPort))
GPIO.cleanup()
```~~~```
```Python
import RPi.GPIO as GPIO
import time
from http.server import BaseHTTPRequestHandler, HTTPServer
import time
print ("EDU - AMPEL")
print ("RPi: " , GPIO.RPI_REVISION, GPIO.RPI_INFO )
# Webserver
hostName = "0.0.0.0"
hostPort = 8000
GPIO.setmode(GPIO.BCM)
isGruen = False
def setLED (rot, gelb, gruen):
GPIO.setmode(GPIO.BCM)
GPIO.setup(4, GPIO.OUT)
isGruen = gruen
if gruen :
GPIO.output (4, True)
else:
GPIO.output (4, False)
class MyServer(BaseHTTPRequestHandler):
def do_GET(self):
print ("INFO:", self.client_address, self.path )
self.send_response(200)
self.send_header("Content-type", "text/html")
self.end_headers()
self.wfile.write(bytes('<html><head> <meta charset="UTF-8"><title>Ampel</title>', "utf-8"))
style ="""
<style>
body {
background-color: lightgrey;
}
h1 {
color: red;
}
p {
color: blue;
font-family: Arial, Helvetica, sans-serif;
}
.circle {
height: 50px;
width: 50px;
border-radius: 50%;
}
.button {
background-color: #4caf50;
border: none;
color: white;
padding: 20px;
text-align: center;
text-decoration: none;
display: inline-block;
font-size: 16px;
margin: 4px 2px;
}
</style>
"""
self.wfile.write(bytes(style, "utf8"))
self.wfile.write(bytes('</head>', "utf-8"))
self.wfile.write(bytes("<body><p>Webserver Response</p>", "utf-8"))
self.wfile.write(bytes("<p>You accessed path: %s</p>" % self.path, "utf-8"))
htmlform = """
<form action="send" method="GET">
<label>Ampel 1:</label><br />
<div class="circle" style="background-color: orangered;"></div><br>
<div class="circle" style="background-color: yellow;"></div><br>
<div class="circle" style="background-color: greenyellow;"></div><br>
<input name="inp" id="inp" class="button" type="submit" value="Press"
style="background-color: gray; border-radius: 50%;" /><br>
</form>
"""
self.wfile.write(bytes(htmlform, "utf8"))
if ("gruen" in self.path):
setLED(0,0,1)
self.wfile.write(bytes("<p> %s</p>" % "Grün", "utf-8"))
else:
setLED(0,0,0)
self.wfile.write(bytes("</body></html>", "utf-8"))
myServer = HTTPServer((hostName, hostPort), MyServer)
print(time.asctime(), "Server Starts - %s:%s" % (hostName, hostPort))
try:
myServer.serve_forever()
except KeyboardInterrupt:
pass # ^z
myServer.server_close()
print(time.asctime(), "Server Stops - %s:%s" % (hostName, hostPort))
GPIO.cleanup()
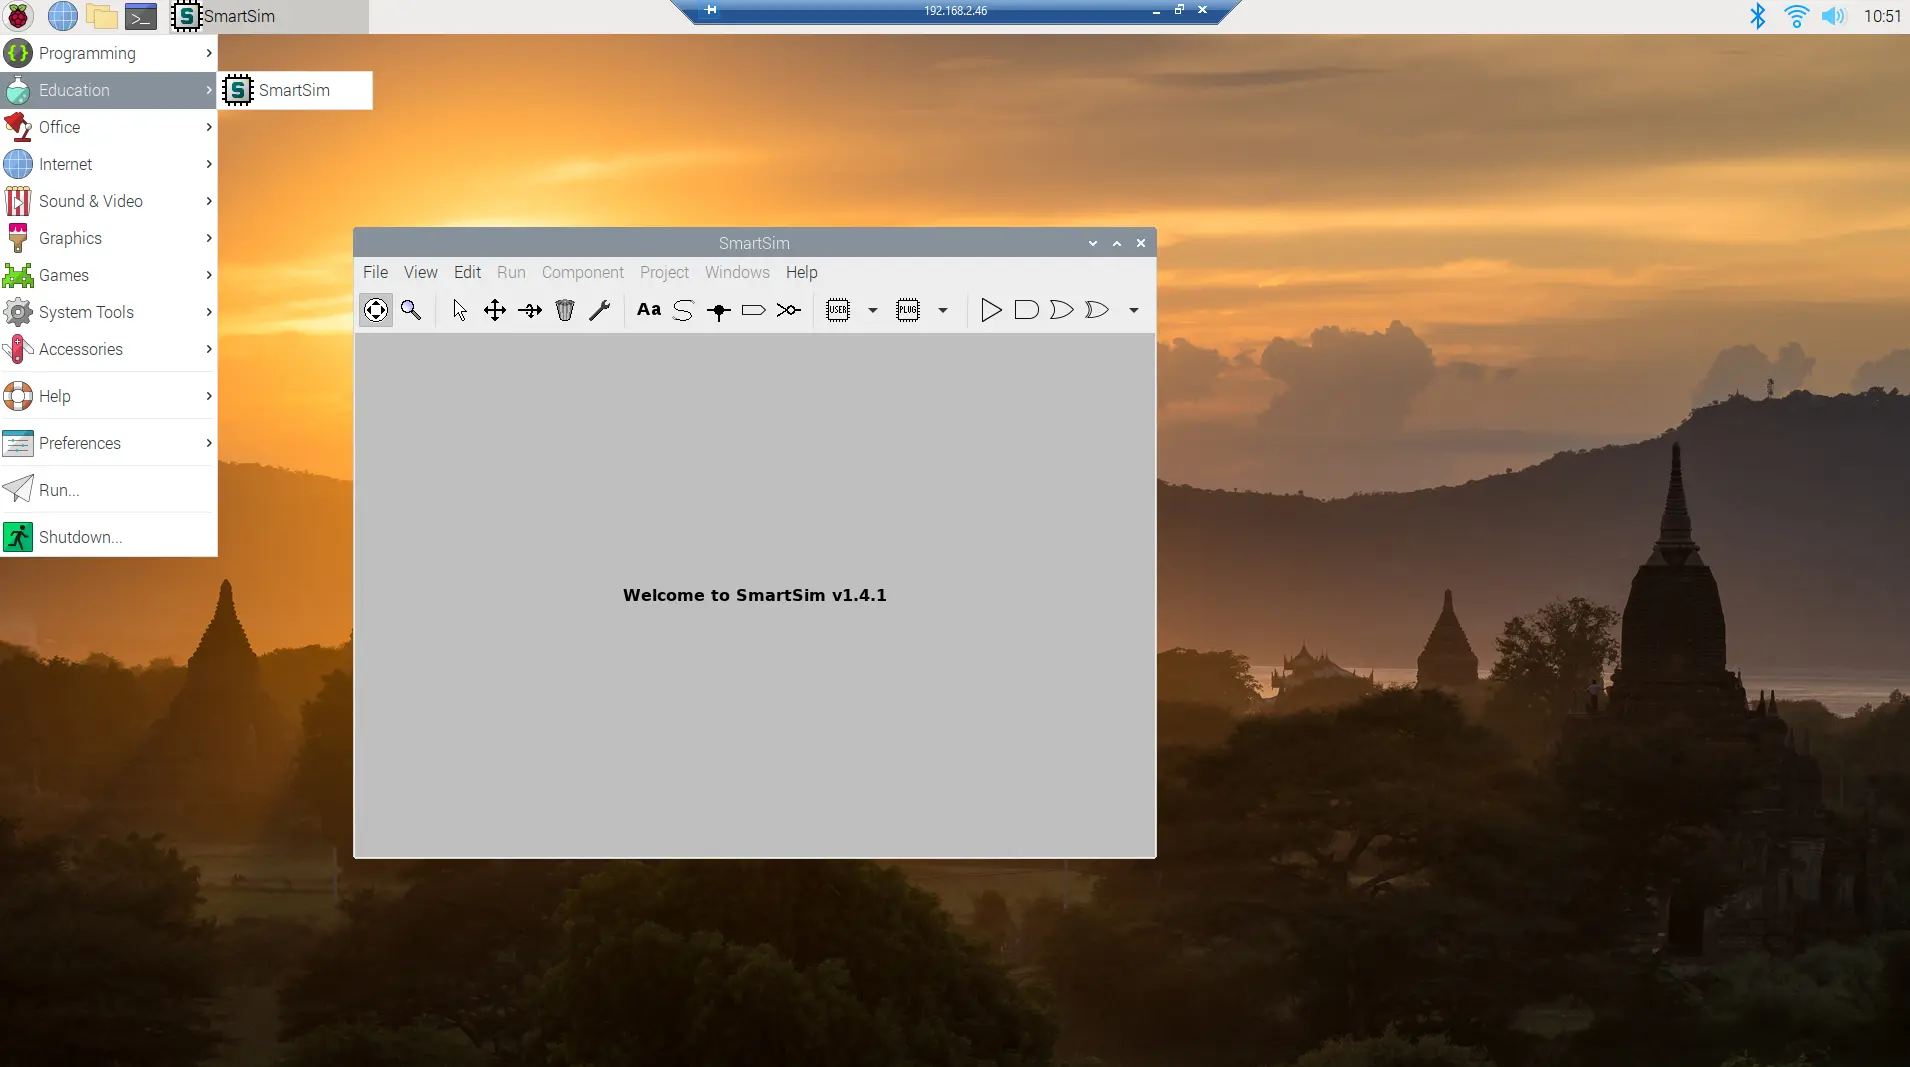
SmartSim Anwendung auf Raspi
das Netzteil …
https://www.elektronik-kompendium.de/sites/raspberry-pi/1912111.htm
Links
https://developer-blog.net/raspberry-pi-gpio-schnittstelle-teil-1/